CloudControl Upgrade Guide
Release Notes
First Published: 12/5/2017, Revised 6/5/2025
IMPORTANT:
This document describes how to upgrade CloudControl in two different methods - Option 1: In-place or Option 2: New Appliance using a new OVA to import the old appliance config. For minor upgrades (ex: 5.1 -> 5.2), use Option 1. For major upgrades (ex: 4.x to 5.x), use Option 2.
Option 1: In-place (For Minor Upgrades)
CloudControl supports in-place upgrades or "patches" when upgrading within the same major version (ex: 5.0 -> 5.1, 5.1 -> 5.5, etc...). You can find the upgrade / patch features under Admin > System Settings > System > In place upgrades. The process is relatively straight forward and can be achieved within minutes.
Step 1: Snapshot VM
Within the vCenter where the CloudControl OVA is deployed, snapshot the VM in case of any issues during the patch process. This will allow you to revert to the previous version before the patch. Note: You do not need to snapshot the virtual machine memory. This will save time and storage by not selecting the option.
Step 2: Apply Patch
Once the VM is backed up, using Administrator privileges, navigate to Admin > System Settings > System > Upgrade Application tab. On this page, click "Begin Patch Process" to proceed.
On the next page (below) you will see the following where you can click or drag the .patch file provided by ReSTNSX support. If you do not have the latest patch file, you can email support@restnsx.com or open a support ticket.
IMPORTANT NOTE 1: Once the patch is applied, the system will restart all services and you will be logged out. While the restart typically takes less than 45 seconds, all user and system operations will be interrupted.
IMPORTANT NOTE 2: If you are using the Policy Engine feature, be sure there are no jobs currently running or scheduled to run within the next few minutes.
Step 3: Verify
The system will restart automatically. If you attempt to refresh your browser before the 45 seconds, you may receive a "bad gateway" message in your browser since the web server is not yet loaded. If this occurs, refresh your browser after the 45 second-1 minute window. Once logged in, navigate back to the Administration page where you will see the version applied.
Option 2: New Appliance (For Major Upgrades)
When upgrading between major versions (ex: 4.x to 5.x), you must export the system configuration from the existing appliance and import it into a newly deployed appliance of the newer version.
To assist in this process, CloudControl leverage configuration export for easy migrations. When exported, the following information is retained:
-
Local Users
-
Saved Workflows
-
Custom Wizards
-
Tenant Information
-
Data Sources
-
System Settings
By exporting this information, upgrades are performed in parallel to the production platform. Once the new version of CloudControl is online, simply import the previously exported configuration file and the system is online. Administrators can manage the same NSX environment(s) with both ReSTNSX versions at the same time and
Note: When both systems are online, configuration settings are not synchronized between the different versions and must be maintained separately until the old version is decommissioned.
Step 1: Export Existing Configuration
Navigate to Admin -> System -> System Backup and Restore to export the current CloudControl configuration for future import. This step will create and download an encrypted file (.config) containing system configuration and existing licenses. Save this file for use in step 2.
Step 2: Install New Appliance
Download the latest CloudControl version from restnsx.com and install the appliance on the same or different host.
Step 3: Import Configuration
-
Browse to the new CloudControl Virtual Appliance via https://<ReSTNSX-IP>. On the login screen, enter the following credentials. Note that the password is case sensitive:
Username: admin
Password: default
-
Click Close on the "No Datasources Detected" pop-up window
-
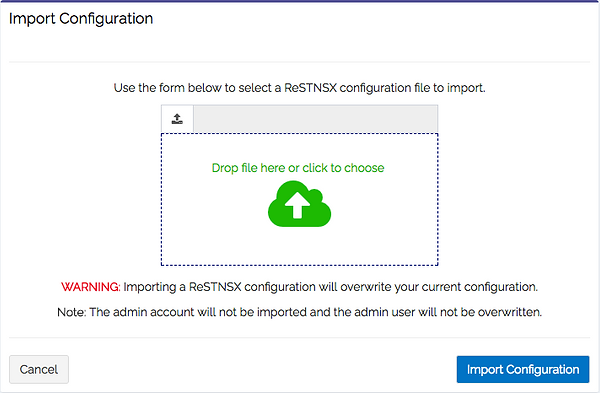
Navigate to Admin -> System -> System Backup and Restore to import the previously saved .config file
-
Click Import Configuration
-
Click upload cloud or drag previously saved .config file into upload area and Click Import Configuration button


-
Confirm settings and Click Import Configuration
Step 4: Verify Datasources
Navigate to System -> Datasources to verify successful import of configuration data.
Note: Datasource status may show as unknown until the polling is complete.
